In Microsoft terms a video conference is called a Meeting. You can have a meeting with anyone, even with a Participant Outside Your Organization (POYO). POYOs are anybody with an email address which has a different domain than your own. The Team App will invite them to join the meeting by sending them an email which contains a link. Because setting up the meeting is done through email (and not in real time), you will need to schedule the meeting, even if you are scheduling the meeting for “right now”. If you wish to start a “right now” meeting and all participants are PIYOs (Participant Inside Your Organization), then please see that article. If any of the participants are POYOs or you wish to schedule a meeting ahead of time, then please follow this article.
What you need to create the meeting:
- A computer with a camera and a microphone.
- An internet connection.
- An appropriate MS Office 365 license
- The Teams App installed on your computer
What the POYO needs to join the meeting:
- A PC, Mac, iPad, iPhone or Android phone.
- An internet connection, or a cellular data plan.
- If you want to be able to see and hear the POYO through Teams, their device requires a camera and microphone.
- The POYO does *not* require a Teams/Microsoft account.
Article Index:
What is Microsoft Teams?:
Work remotely without feeling remote
Get started with Teams:
Take your first steps
Meet with people inside your organization:
Video conference with someone inside your organization
Meet with people outside your organization:
Video conference with someone outside your organization
Join a Meeting:
How to join a meeting as an outside participant
Tips:
Several suggestions to easily navigate the many features
NOTES:
- When clicking the link to join the meeting, the POYO will be prompted to download/install the Teams app, or to just join it through their browser. The Teams app will provide a better experience, and is the preferred method especially if they will be joining more meetings.
- You cannot join a POYO to an existing meeting by entering their email address in Teams. You will have to click the Copy Link Info icon (
 ) and paste the link into an email in your email client. Alternatively, you can cancel the current meeting and create a new one with the existing participants and the desired POYO. PIYO can be joined to existing meetings by simply entering their email address in Teams.
With Teams your company can provide the tools to allow your employees to quickly and easily work together emulating online the environment of a typical office. Despite the geographic distances, they can easily speak face-to-face or in groups, chat and catch up on the latest details, look over each other’s shoulders as they collaborate on a document, and scan the company’s document library.
Best of all, these tools are absolutely free.
Start a Meeting with a POYO

Open the Teams App (Not through a browser, but the full App). If it is not installed, then please see the instructions in the Teams – Getting started article.

Click the Calendar icon (
 ) on the left
Click the New Meeting icon (
 ) at the upper right
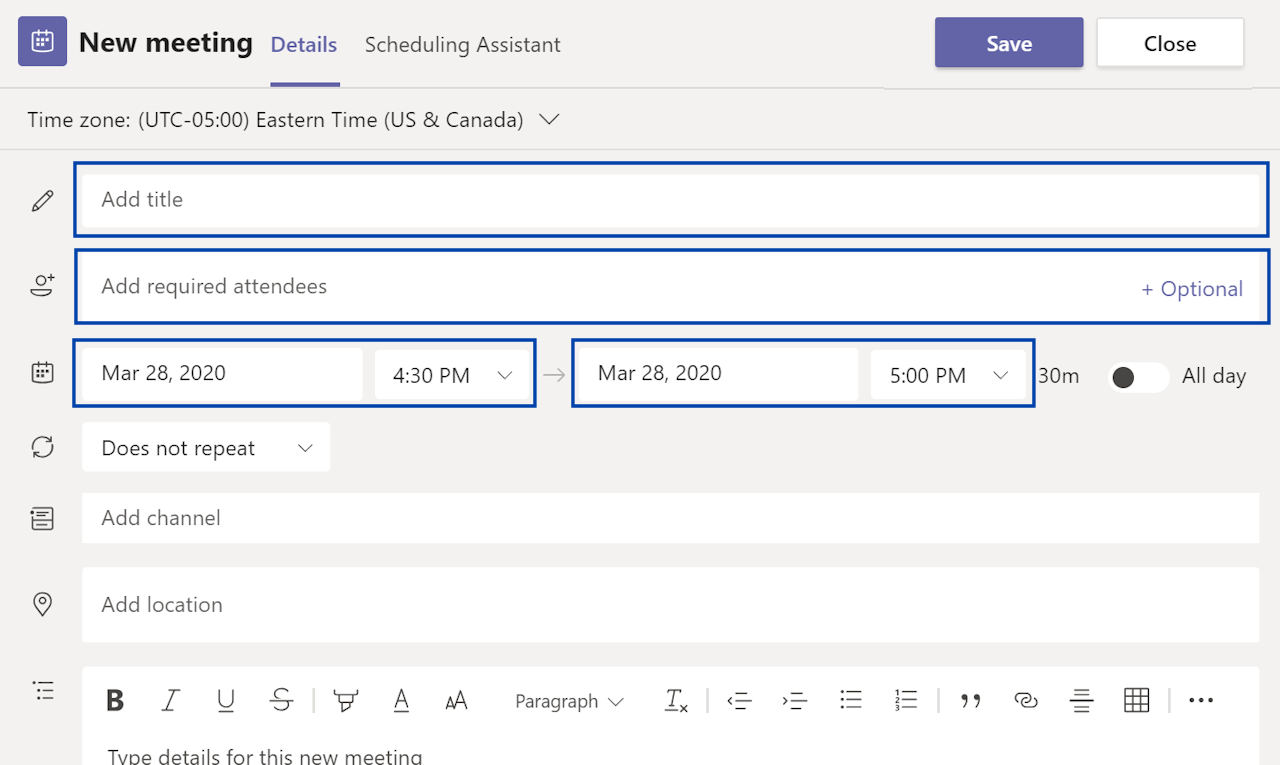
Enter the required fields in the form:
- Meeting Title
- Required Attendees. Enter the first name (PIYO) or email addresses (POYO) of all participants
- Start and End dates: The Date will automatically fill in for “right now” or you can schedule it for some time in the future.
Then click the Save button.


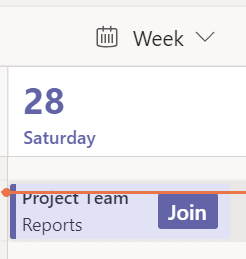
 Once the Meeting has been created, you are brought back to your Calendar, where you will see the new Meeting. The Meeting in this screen clip was created by a user named “Reports”.
NOTE: If the Time of the meeting is already upon us, you will see the Join button as you do in this example. Click it to join the Meeting. If the Meeting time is a few minutes off the Join button will be missing, but you can still join the meeting by clicking the Calendar item (see step 6 below).
NOTE: In this case, the Meeting was created on a Saturday, which the default display for “Work Week” does not display. I had to select “Week” from the drop down at the top of this image.

If the Meeting start time is still a few minutes away, and you click on the Calendar item, you will be presented with the details of the Meeting. From here you can click the Join button and join the Meeting ahead of time.


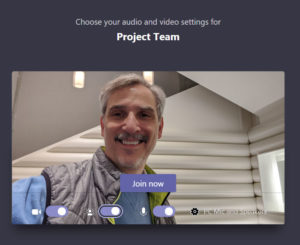
Once you click the Join button, you will be brought to the lobby. From the lobby you can:
- Confirm that your camera and microphone are on by checking the sliders next to the camera (first icon from the left) and microphone (third icon from the left) icons.
- Blur your background to make it less distracting (second icon from the left).
Once everything is set correctly, click the Join Now button

Welcome to the Meeting!
You are now in the Meeting, with anyone else who has already joined. Once they join, you will see their image(s) in the main window, and a copy of your image (which they are seeing) is in the bottom right corner.
NOTE: If the Meeting is configured for participants to wait in the lobby until the Meeting organizer “invites” them in, you will see an orange dot on the Show Participants icon in your Taskbar and inside the dot will be the number of participants waiting in the lobby. In this case, you must click the Show Participants icon and then click the checkmark next to each Participant you wish to allow in. This can also happen if the

You can control the Meeting through icons on the Taskbar. If you don’t see the Taskbar, move your mouse or click on the main window of Teams. They icons are:
 The Camera icon allows you to turn on and off your camera. While it is off, the other participants of the Meeting will not be able to see you.
 The Microphone icon allows you to turn on and off your microphone. While it is off, the other participants of the Meeting will not be able to hear you.
 The Share icon allows you to share another Window or Application with the other participants. Instead of seeing you, they will see the shared Window or Application. Click this icon again to stop sharing the selected item.
Note: If you are sharing a video, please click the “Include system audio” box if you want them to hear the associated audio.
 The Settings icon brings up the Settings Menu with more options.
 The Chat icon allows you to share text messages with the other participants.
 The Show Participants icon show you who is in the Meeting. It will identify the organizer of the Meeting, and which users where invited but are not participating.
 Click the Hang Up icon to leave the Meeting.
When you are finished with the Meeting, you should cancel it. Either party can re-enter Meetings, even after the scheduled end time.
To cancel the Meeting, select the Calendar
 icon on the left. Once in the calendar, click the Meeting item and the click “X Cancel meeting” in the upper left corner.
NOTES:
- When you, the Meeting organizer, Hang Up and leave the Meeting, the other participants can still remain in the Meeting. Even after the organizer cancels the Meeting, it can still continue until the last participant leaves.
- When the organizer cancels the meeting, POYOs will receive another email stating that the Meeting has been canceled.
If you have questions about this, please let us know and we will be happy to assist you.
Take care,


 Once the Meeting has been created, you are brought back to your Calendar, where you will see the new Meeting. The Meeting in this screen clip was created by a user named “Reports”.


 The Camera icon allows you to turn on and off your camera. While it is off, the other participants of the Meeting will not be able to see you.
 The Microphone icon allows you to turn on and off your microphone. While it is off, the other participants of the Meeting will not be able to hear you.
 The Share icon allows you to share another Window or Application with the other participants. Instead of seeing you, they will see the shared Window or Application. Click this icon again to stop sharing the selected item.
 The Settings icon brings up the Settings Menu with more options.
 The Chat icon allows you to share text messages with the other participants.
 The Show Participants icon show you who is in the Meeting. It will identify the organizer of the Meeting, and which users where invited but are not participating.
 Click the Hang Up icon to leave the Meeting.


