Take a screenshot, it lasts longer!
Taking screenshots is a valuable skill that allows you to capture and save a permanent visual representation of the temporal display on your device’s screen. This skill can be incredibly useful for various situations like: documenting error messages for tech support, sharing information with others by visually highlighting specific details, saving important data from a webpage, capturing evidence of online activity, or simply preserving a memorable moment from social media; essentially, whenever you need to quickly capture what’s on your screen to reference later or share with someone else.
Here’s a guide on how to take screenshots on different devices.
More information:

Simultaneously really does mean “at the same time” in this context. Some of the key sequences below include keys that will do something else if all keys are not pressed at the same time. For instance, on the iPhone the key combinations include the power key. If you press the power key before pressing the Volume Up key, you will close the phone instead of taking a screenshot. You may want to practice these procedures on your devices before being in a position in which you *need* to take a screenshot so you are ready.
Why You Might Want to Take Screenshots
The following are several situations in which taking a screenshot could come in handy.
Troubleshooting and Technical Support
When encountering an issue with your device, a screenshot can help you explain the problem to technical support more clearly. It provides a visual representation of the error message or issue you’re facing. In fact, this is point #3 on our list of ways to Help Us Help You.
Instructional
Screenshots are a quick way to share information with others. As they say, “A picture is worth a thousand words.”
Record Keeping
Screenshots can serve as a record of important information, such as receipts, confirmation numbers, or important messages. This can be particularly useful for online transactions or communications as evidence of your activities or progress.
Creating Tutorials and Guides
If you’re creating a tutorial or guide, screenshots can help illustrate the steps more clearly. They provide a visual aid that can make instructions easier to follow.
Collaboration
In a professional setting, screenshots can be used to share progress, highlight issues, or provide feedback on projects. They can be a valuable tool for collaboration and communication.
Social Media
Capture funny moments, interesting visuals, or quotes from social media platforms to share with others.
How to take screenshots on various devices
Windows PC
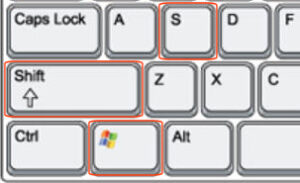
Press Windows + Shift + S keys simultaneously to open the Windows Snipping Tool. Select the area to capture. The screenshot is copied to the clipboard.

More details about the Windows Snipping Tool
You will get a brief popup in the bottom right corner of your computer immediately after capturing the screenshot. If you click on the popup before it disappears, then the Snipping Tool will appear on your screen, giving you more options such as to annotate the screenshot or save it as a file. If you don’t respond to the popup, then it will disappear and your screenshot will be copied to your clipboard and you can paste it into a document or program by using the Ctrl-V key sequence (press and hold the Ctrl Key and then tap “v”).
Mac
To capture the entire screen, press Command + Shift + 3 keys simultaneously.

To capture a selected portion of the screen, press Command + Shift + 4 keys simultaneously.

More information about take a screenshot on a Mac.
After pressing the key combination, the cursor will change into a crosshair. Move the crosshair pointer to where you want to start the screenshot. Press the mouse or trackpad button, drag over the area you want to capture, then release the mouse or trackpad button. The screenshot is saved to your desktop with the filename “Screenshot [date] at [time].png”.
iPhone
The steps to take a screenshot on an iPhone will depend on how new your iPhone is and if it has a Home button.
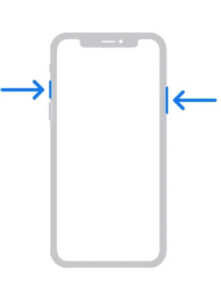
On newer iPhones without a Home button, simultaneously press the side/power button and Volume Up button.

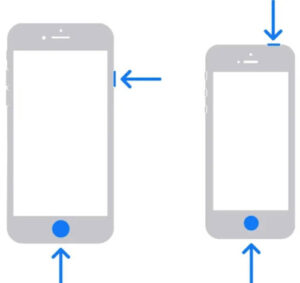
On older iPhones with a Home button, simultaneously press the Home button and the side/power (or Top) button.

More information about taking a Screenshot on you iPhone.
With both older and newer iPhones, the screenshot will be added to your pictures gallery.
Android phone
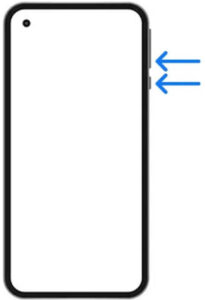
Since many Android phones and tablets have carrier-based OS overlays, they act differently. Most will allow you to do the following:
Press the Power and Volume down buttons simultaneously

More information about taking a Screenshot on an Android device.
Your device will take a screenshot and save it. At the bottom left, you’ll find a preview of your screenshot.
iPad
On an iPad, use the same button combinations as the iPhone above.
More information about taking a Screenshot on an iPad.
TIPS
Take a screenshot of QR codes:
I take screenshots of the QR code generated by apps, especially my airline boarding app. When I approach the desk to scan my boarding QR code while boarding, I just scan the picture in my gallery. I don’t have to hassle with the app, or worry that the app will crash or do an unplanned update at such an inconvenient time.
In a pinch, take a picture with your phone:
If you need a screenshot of a device other than your phone, you can also just take a picture with your phone. If the key sequence is giving you a problem, or you don’t remember it, just take a picture with your phone.
If you have questions about this, please let us know and we will be happy to assist you.
Take care,

Toggle title
Toggle content goes here, click edit button to change this text.


