The MS Office AutoSave feature can save you from disaster
Have you ever forgotten to save a document and lost your work? Or the computer froze up before you could save that half-written report you’ve been working on for two hours? Microsoft’s AutoSave function was created to protect you from these events. But you need to be aware of how to use it to prevent causing problems.
This article will show you how to use it without getting into trouble.
More Information:
What is AutoSave?
Information directly from Microsoft
AutoSave: Nice Feature…
An Article by Tony Redmond
IMPORTANT!
If you do not wish to use AutoSave, then you should turn it off (by clicking the switch) as soon as you open the document.
NOTES:
- If AutoSave is on, then there are no File > Save or File > Save As options. But there will be a File > Save a Copy option.
- If you are not sure about the changes you will be making, we recommend using File > Save a Copy before making changes to create a separate copy.
- If you don’t want to keep your changes, you can use version history to revert to one of the previously saved versions.
Prerequisites to use AutoSave
The AutoSave feature is convenient, but it is not available to everyone in every situation. Only when all of the following are true will you be able to use it:
- The AutoSave feature is available through the MS Office 365 subscription license. If you purchased MS Office through some other way, then AutoSave will not be available to you.
- The file you are working on must be saved in OneDrive, OneDrive for Business or SharePoint. Other file locations do not benefit from AutoSave.
- The file must be in the newer format of Word (.docx), Excel (.xlsx) or PowerPoint (.pptx). Documents in older formats will not be autosaved.
Look for the AutoSave feature (![]() ) at the upper left of your Word, Excel or PowerPoint program to see if it is available to you.
) at the upper left of your Word, Excel or PowerPoint program to see if it is available to you.
How AutoSave works
AutoSave, as the name implies, saves your document automatically, every few seconds. As you make changes to the file, it will automatically save the document to OneDrive or SharePoint, relieving you of this necessity. In fact, you can’t save the document manually, because the “Save” and “Save as” functions are missing when AutoSave is engaged.
Just open a document, or create a new one and as long as AutoSave is enabled all of your efforts are saved. When you are finished editing the document, just close it.
How to turn on AutoSave
If AutoSave is available to you (see prerequisites above), and you are working on a document in OneDrive or SharePoint, then it will automatically be engaged. You may want to confirm this by looking for the AutoSave feature at the upper left of your Word, Excel or PowerPoint program: ![]() . If it is turned off, then you may not be working on a document in OneDrive or SharePoint. In the following screenshot, we see that AutoSave is turned on and that the document: test.docx is currently Saving…
. If it is turned off, then you may not be working on a document in OneDrive or SharePoint. In the following screenshot, we see that AutoSave is turned on and that the document: test.docx is currently Saving…

A word of warning about AutoSave
If AutoSave is enabled, it will save changes as soon as you make them. This means that if you make several changes to a document and decide that you don’t want to keep them, you can’t just close the document without saving (as you were able to do without the AutoSave function), because the changes have already been saved. In this case, you must restore a previous version of the document (see Versioning in AutoSave below).
If you open a document with the intent of using it as a template, and wish to make changes and save it under a new file name, then you can’t wait until after you make the changes. You must save a copy of the document immediately with a new file name, and then make your changes. As stated, the File > Save and File > Save As options are not available with AutoSave enabled, but the File > Save a Copy option is available. In this scenario of using a document as a template, simply open the document, immediately select File > Save a Copy and save a copy of the document under a new name. Then make your desired changes to the new document. In the event that you change your mind, you can simply delete the new file.
Versioning in AutoSave
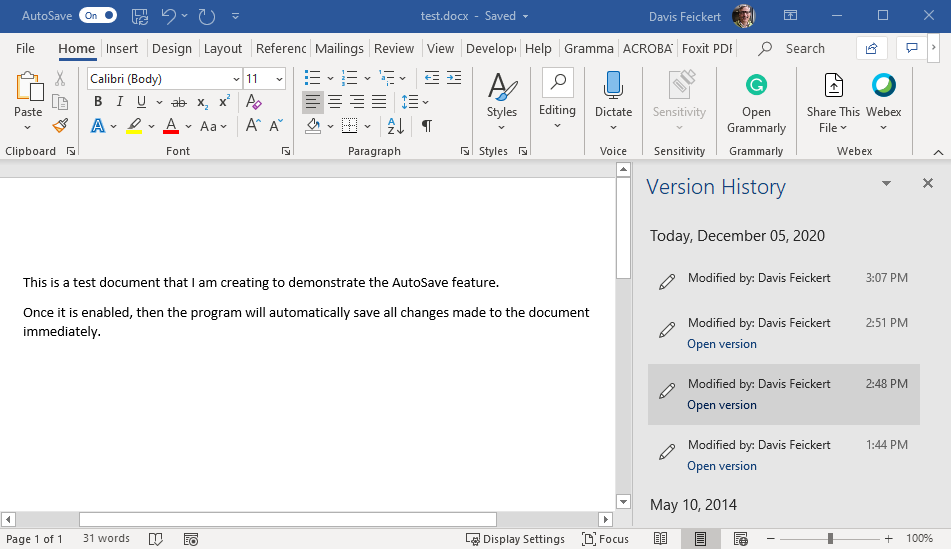
When you re-open a document and start making changes, AutoSave creates a new version of the document. This allows you to restore a previous version in the event your changes are not desired, or if you want to compare the previous version with your current version. To view the list of previous versions of a document, open it, then click the small down-arrow to the right of the document name to bring down the document menu. Then click Version History.

This brings up the Version History as shown on the right of the following screenshot:

Using Version History
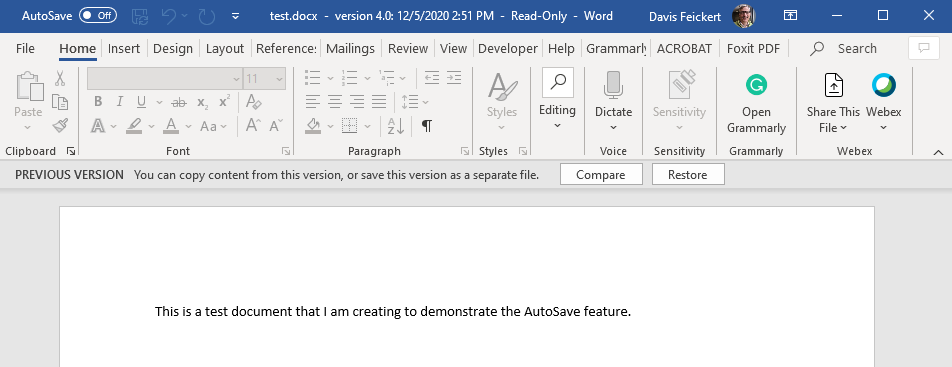
Once you have brought up the Version History list (as shown above), you can click the Open version link on a previous version. Doing so will bring up a separate window showing the previous version. In addition to being able to see the previous version, it will also provide you with the options to Compare and Restore. This screenshot shows these options:

The Restore option will restore the previous version. In this case another version of the document is created with the contents of the previous version. If you made a mistake by restoring a previous version, you can always open the Version History again and restore a different previous version, including the one you just replaced.
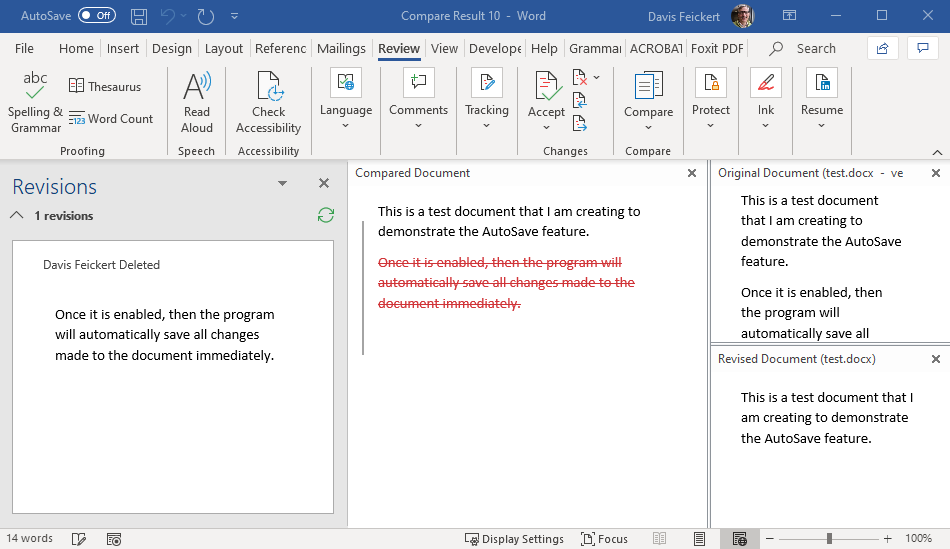
The Compare option brings up a separate window with the current document and edits showing the changes from the previous version to the current version, as shown in the following screenshot:

FAQs:
Can I turn off AutoSave?
Yes. Just click the AutoSave switch at the upper left of your program to turn it off (![]() ). If you turn it off, please remember to save, but rest assured that AutoRecover still works in the event of a system crash.
). If you turn it off, please remember to save, but rest assured that AutoRecover still works in the event of a system crash.
NOTE: if you turn AutoSave off for a file, the program will remember your setting, and it will remain off even if you close the document and open the same file again.
I didn’t want my changes saved. How do I go back?
You can restore a previous version of the file using Version History. At the top of the window, click the filename, and then click Version History. Review the dates and times to find the version that you want to restore, and then click Open version. A second window will open showing that version of the file. To roll back to this version, click the Restore button. For more information on version history, see View historical versions of Office files.
When you open a file and make your first changes, AutoSave saves those changes and a new version of the file is added to the version history. After that even though AutoSave is regularly saving your changes to the file, new versions are only added to the version history periodically (about every 10 minutes) for the remainder of your editing session.
What happened to File > Save As?
Save As isn’t on the File menu when you open a document from OneDrive, OneDrive for Business or SharePoint Online. In these cases, the Save a Copy command appears on the File menu instead.
Do you use Save As a lot? Many people are used to working on a file, and then using File > Save As to keep the changes in the copy and not the original. However, when AutoSave is on, your changes are continually saved to the original. So we recommend using File > Save a Copy before you make any changes if you want your changes to apply to the copy and not the original.
I don’t see AutoSave. How do I make sure files are getting saved?
AutoSave appears in the upper-left corner, on the title bar, if you are an Microsoft 365 subscriber, and you have the latest versions of Excel, Word, and PowerPoint for Windows installed. Please see the prerequisites in the article above.
If you’re not a subscriber, don’t worry. There’s still AutoRecover. AutoRecover helps protect files in case of a crash. If you reopen the file after a crash, a version of the file with your latest changes appears in a Document Recovery pane. For more information on how to turn it on, see Help protect your files in case of a crash.
And, of course, you can always save manually the way you always have, by either pressing CTRL+S, clicking the Save button, or going to File > Save.
The easy way is to turn the AutoSave switch off before you make your changes. If the changes are meant to be temporary and not saved, close the file. Then click No when you are asked to save. If you decide you do want to save the changes, just turn AutoSave back on.
If you don’t want to save continually and you don’t want to show others your changes, you can turn AutoSave off. Then, when you’re ready, click Save (or press CTRL+S) to save and show your changes to any other people working on the file. (Or, you can also turn the AutoSave switch back on to save and share your changes.)
The default for AutoSave is to always be On for files that are on the Microsoft Cloud. However, if you turn AutoSave Off for an individual file, the program will remember and will keep it off every time you reopen that file. If you switch it back On for a file, it will remember to keep in on for that file.
When AutoSave is off, AutoRecover still works in the event of a system crash while your file is open.
If you have questions about this, please let us know and we will be happy to assist you.
Take care,


